라라벨 이벤트의 사용 방법
1. Event 와 Listener를 생성한다.
가장 쉬운 방법은 app/Providers/EventServiceProvider.php 에 아래와 같이 이벤트와 리스너를 적어준다.
<?php

namespace App\Providers;

use Illuminate\Auth\Events\Registered;
use Illuminate\Auth\Listeners\SendEmailVerificationNotification;
use Illuminate\Foundation\Support\Providers\EventServiceProvider as ServiceProvider;
use Illuminate\Support\Facades\Event;
use Illuminate\Support\Testing\Fakes\EventFake;

class EventServiceProvider extends ServiceProvider
{
    /**
     * The event listener mappings for the application.
     *
     * @var array
     */
    protected $listen = [
        Registered::class => [
            SendEmailVerificationNotification::class,
        ],

        // TestEvent 와 TestEventListener 를 적어준다.
        'App\Events\TestEvent' => [
            'App\Listeners\TestEventListener',
        ]

    ];

    /**
     * Register any events for your application.
     *
     * @return void
     */
    public function boot()
    {
        //

    }
}
그리고 나서 아래 명령어로 Event와 Listener 생성
$ php artisan event:generate위 한줄로
app/Events/TestEvent.php
app/Listeners/TestEventListener.php
이 두 파일이 자동으로 생성 된다.
참고사항 :
Event만 생성 시
$ php artisan make:event TestEventListener만 생성 시
$ php artisan make:listener TestEventListener
2. 이벤트를 발생시키고 싶은 곳에 event() 를 작성한다.
<?php

namespace App\Http\Controllers;

use App\Events\TestEvent;

class TestController extends Controller
{
    public function index()
    {
        $val = "변수전달 테스트";

        //event 발생시킴
        $result = event(new TestEvent($val));

        return $result;
    }
}
그럼 TestController 에서 index 함수가 실행 될때 이벤트가 발생 된다.
3. 이벤트를 받는다.
<?php

namespace App\Listeners;

use App\Events\TestEvent;
use Illuminate\Contracts\Queue\ShouldQueue;
use Illuminate\Queue\InteractsWithQueue;

class TestEventListener
{
    /**
     * Create the event listener.
     *
     * @return void
     */
    public function __construct()
    {
        //
    }

    /**
     * Handle the event.
     *
     * @param  TestEvent  $event
     * @return void
     */
    public function handle(TestEvent $event)
    {
        //
        dd($event);
    }
}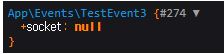
그런데 변수가 안들어온다.
변수 전달은 app/Events/TestEvent.php 의 생성자에서 세팅 해준다.
<?php

namespace App\Events;

use Illuminate\Broadcasting\Channel;
use Illuminate\Broadcasting\InteractsWithSockets;
use Illuminate\Broadcasting\PresenceChannel;
use Illuminate\Broadcasting\PrivateChannel;
use Illuminate\Contracts\Broadcasting\ShouldBroadcast;
use Illuminate\Foundation\Events\Dispatchable;
use Illuminate\Queue\SerializesModels;

class TestEvent
{
    use Dispatchable, InteractsWithSockets, SerializesModels;

    /**
     * Create a new event instance.
     *
     * @return void
     */
    public function __construct($v)
    {
        // 변수 세팅
        $this->v = $v;
    }

    /**
     * Get the channels the event should broadcast on.
     *
     * @return \Illuminate\Broadcasting\Channel|array
     */
    public function broadcastOn()
    {
        return new PrivateChannel('channel-name');
    }
}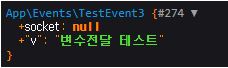
v로 잘 들어오는 것 확인
4. subscribe 를 알아보자
listen과 subscribe의 차이
listen : 1개의 이벤트에 대해 N개의 리스너 등록 가능
subscribe : N개의 이벤트에 대해 N개의 리스너 등록 가능
listen 사용시
<?php
    protected $listen = [
        // TestEvent 이벤트는 1개만 매칭 가능, N개의 리스너 사용 가능
        'App\Events\TestEvent' => [
            'App\Listeners\TestEventListener',
            'App\Listeners\TestEventListener2',
            'App\Listeners\TestEventListener3',
        ]
    ];

}
subscribe 사용시
<?php
    protected $listen = [
       // 여기 아니고
    ];

    // 여기에 작성
    protected $subscribe = [
        'App\Listeners\TestEventListener2',
    ];

}
그리고 TestEventListener2.php 에서 여러개의 이벤트를 작성해서 수신한다.
<?php

namespace App\Listeners;

use App\Events\TestEvent2;
use Illuminate\Contracts\Queue\ShouldQueue;
use Illuminate\Queue\InteractsWithQueue;
use Illuminate\Support\Facades\App;

class TestEventListener2
{
    /**
     * Create the event listener.
     *
     * @return void
     */
    public function __construct()
    {
        //
    }

    /**
     * Handle the event.
     *
     * @param  TestEvent2  $event
     * @return void
     */
    public function handle(TestEvent2 $event)
    {
        //
    }

    public function Lis3($event)
    {
        dd('Lis3 실행 === ');
    }

    public function Lis4($event)
    {
        dd($event);

    }

	// 여기에 작성
    public function subscribe($events)
    {
        // 여러개의 이벤트를 등록 가능
        $events->listen('App\Events\TestEvent', [TestEventListener2::class, 'Lis3']);
        $events->listen('App\Events\TestEvent2', [TestEventListener2::class, 'Lis4']);

    }
}
Laravel 8.x 기준으로 작성했고, 문법이 이전버전과 약간 다른부분도 있으니 버전에 따라 가이드 확인 필수.
https://laravel.kr/docs/8.x/events
라라벨 8.x - 이벤트
라라벨 한글 메뉴얼 8.x - 이벤트
laravel.kr
반응형
'Laravel' 카테고리의 다른 글
| [Laravel] Swagger API 적용 하기 (0) | 2021.11.11 |
|---|---|
| [Laravel] db에 더미 데이터 만들기 (0) | 2021.11.10 |
| [Laravel] Tinker 대화형 코드 실행 사용법 (6) | 2021.10.06 |
| [Laravel] route 수정 후 적용 안될 때 (0) | 2021.09.27 |
| [Laravel] where 로 조회한 Builder 한번에 Update 하기 (0) | 2021.09.13 |